Studying how Beech built interior components, particularly side panels and headliners, is a classic micro study in product evolution. As mentioned at the end of last month’s article, Beech side panel and headliner designs evolved through four very distinct stages. True to the legend of Beech quality, they were consistently better than their competitors at any given period. That’s not to say that all of their design and materials choices were always of the highest quality. Over the years, Beech had to compromise to remain somewhat competitive in this modern world of plastic materials and bottom-line bean counters. As we study the original construction and subsequent repair techniques for the different generations of interior side panels and headliners, you will quickly see what I’m talking about.
I consider the first generation of side panel / headliner design as being those installed in the 1947 straight 35 through the 1952 C35 airplanes. Both the headliner and side panels were large form-cut flat panels of .016” 2024 T-3 aluminum. These panels were covered with thin fiberglass padding and wool fabric, with leather on the armrests and upper side panels. A minimal amount of top stitching was used for some surface design and material support. The armrest of the day was a 40’s Studebaker-looking screw-on job. Very quaint!
These panels were held in place by standard ⅛” diameter aircraft rivets located at the panel’s edge. This sounds great in concept but Beech used an automotive spring steel receiver clip to held the rivet in its corresponding mounting hole in the aircraft’s structure. When new, this system worked great, but let a little corrosion develop between the steel clip and the aluminum rivet and it became impossible to remove the side panel or headliner without damaging the thin aluminum backing panel.
We use a homemade tool fabricated from a cheap screwdriver to help reduce the damage caused by these stubborn fasteners. Don’t even consider re-using these bad boys. Fortunately, in the early sixties Beech came up with a durlon push fastener that fits the original holes, holds well and releases easily, making damage-free removal and reinstallation of the panels a snap. Even with the durlon fasteners, I still use my homemade tool to assist in removal (you can never be too careful).
As I mentioned earlier, these panels were fabricated out of oh-too-thin, sixteen thousandths aluminum. I strongly suggest that any new panels fabricated be out of twenty thousandths (.020”) 2024 T-3 aluminum, available from numerous sources, including Airparts Inc (800-800-3229). For very little weight increase, a much more durable and maintainable side panel system can be fabricated. When your old panels are stripped of upholstery materials, and tapped flat with a light metal-working hammer, you will have a perfect set of accurate patterns for the new side panels.
Whether you’re making new panels or repairing old ones, take this opportunity to make these components easier to remove and install. From 1949 until 1960, Beech made the left side panel as one long single piece. What a pain to get around the main spar structure. To eliminate this problem, cut the panel into two pieces, separating it at the aft edge of the front spar diagonally up to the center of the first window post. Install a support bracket behind the seam that is wide enough for two strips of 1” velcro. Unsightly mounting screws can be eliminated if the edges of this seam are secured with velcro, and when the panel is installed the seam is hidden by the pilot’s seatback – very nice, and a snap to remove and reinstall.
If you choose to re-use the original thin panels there are two common types of damage that you are likely to see and which must be addressed. The first is bent and deformed metal, mostly near or at the metal’s edge. To straighten this, use a very small ballpeen hammer and ever-so-lightly start at the outer edge of the deformation and work toward the apex (or high spot) of the bend. Do not start whacking at the apex – this will cause the metal to stretch, and develop a permanent warp. Be patient and remember, practice makes perfect.
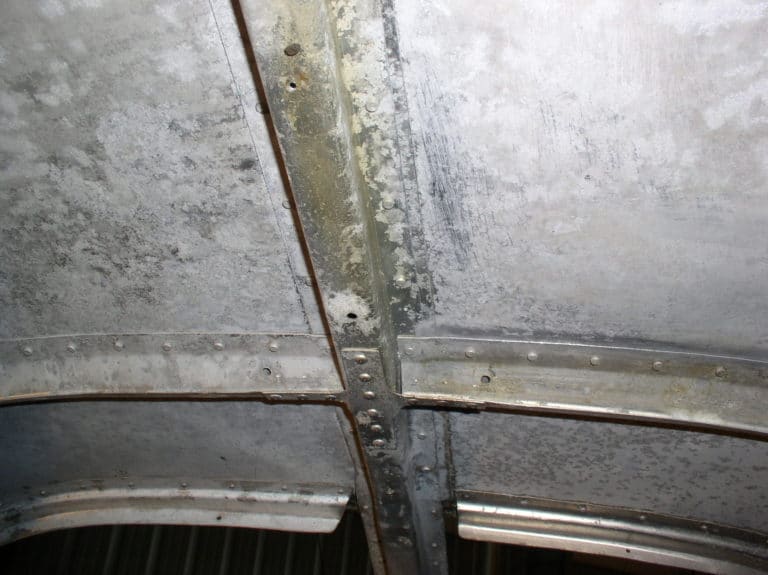
The second most common problem is a tear at the metal’s edge. Here a scarf or overlay patch is the fix. We use soft ⅛” hardware store pop rivets and twenty thousandths 2024 T-3 aluminum. The photo says it all. We often tap the installed pop rivets with a light hammer and then sand or file the protruding heads down to a minimum to keep the repair from showing through the new upholstery.
Before moving on to the next generation of side panels, I want to spend a little time solving a problem common to all of the Bonanza-derivative airframes, mainly the aft bulkhead access panel (or what’s left of it). This thin aluminum removable panel allows access to the equipment-laden aft tail cone area. This thing didn’t stand a chance from inception. It must be removed for every annual or whenever the HSI gyro, autopilot or ELT decides to lean on your wallet. To make matters worse, the darn thing is held in place by no fewer than about 50 screws. Human nature being what it is, only about half of the screws get removed and the panel is bent out of the way just enough to sneak in there and tweak whatever needs tweaking. After 20 or 30 years of that activity, the aft bulkhead panel looks like something that would strike fear in the heart of the most seasoned crash test dummy. With the invention of velcro, this problem is history. Rivet a 2” wide L-shaped angle up both sides of the aft bulkhead. Install 1” wide velcro to these new aluminum strips, fabricate a new .020” 2024 T-3 aluminum access panel in the likeness of the original, and hold it in place with mating velcro. Locate a 1½” diameter hole about 3” in from each corner to have a way to pull the panel free and you have a mechanic-proof, durable aft bulkhead panel. It’s worth the effort. Our customers like it so much we often use it on newer Bonanzas, too!
The second generation of Beech airplanes, 1953 F35s through 1960 M35s, had the very classic-looking, somewhat sculpted armrests with a blind-mounted stainless steel accent molding. The problems found in the earlier side panels and headliners apply also to this generation of interiors, including replacing the aluminum mounting rivet with the later durlon fastener. There are two problems with the armrests, however, that are unique to this group. First is how Beech attached the stainless steel trim strips. In order to blind mount these strips (no visible mounting hardware), thin steel tabs were wedged into the back side of the stainless strips. These tabs often break off as they are straightened when the strips are removed or as they are being re-bent when re-securing the strips after new upholstery has been applied. Not to worry, though, a good fix is at hand. Using a #43 drill bit, drill a hole through the side panel into the steel tab strip. Be careful not to drill into the stainless molding. Then secure the trim strip with short #4 PK screws. This is a good thing to do even if all the original mounting tabs have survived previous removal and reinstallation.
The second problem common to this type of interior is damaged plastic armrests. These armrests are one of Beech’s earliest attempts at fabricating parts from vacuum formed royalite plastic. I hate it. As bad as this material is, though, it is very repairable using cyanide acrylite adhesive (we’ll get to this later).
The third generation of side panel / headliner design used by Beech is the system in airplanes manufactured from 1962 through approximately 1974. From the standpoint of build quality and durability this is the best system to date. I’m referring to the all aluminum side panels that were mounted on two (sometimes three) aluminum extruded rails that run parallel to one another through the entire length of the cabin. Very little mounting hardware is required to secure the various interior and headliner panels because they are fit into and retained by the rails. To remove the various pieces, all one does is bow the panel slightly from one end and progressively pull it out of its respective mounting rail. Caution must be exercised so as not to get a kink in the metal as it is removed or reinstalled, but with a little practice, you will find it quite easy to work with. Of course, any upper and lower edges that are not retained by a rail must be secured with upholstery screws or blind durlon push fasteners mentioned earlier.
As good as this system is, there is room for improvement, particularly with the headliner. The forward half of the headliner is secured at the outer edge by the durlon push fasteners. Once the outer edge is removed, the inner edge will easily come out of the aluminum mounting rail. However, removing the aft portion can be quite tedious, as both the inner and outer edges are secured by aluminum extruded rails that are rather close together. The problem is magnified by the fact that the headliner panel is bowed to a concave contour in this area in order to conform to the very curved shape of the aft cabin top. Most of the time these headliner panels are kinked and deformed or even torn at the outer edges due to how difficult it is to remove and install them.
Here’s the fix. Using the old panels as patterns, fabricate new .020” 2024 T-3 aluminum panels. Pad and upholster them with new material. Before installing these new panels, remove the aft and outer retaining rails that hold both the upper aft window frame and the outboard aft portion of the headliner. Re-mount the rails from the bottom side only with counter-sunk PK sheet metal screws and folded tinnerman nuts. Now that this rail is removable, you no longer have to bow the headliner panel to install or remove it. All you do is secure the headliner in the inner mounting rail, and with the outer push pins securing the forward half of the headliner, mount the aft mounting rail from the bottom side with the countersunk PK screws. It’s easy, and no more bent and torn headliner.
The other trouble spot in this system is the aft bulkhead access panel, a high traffic area for the maintenance folks as discussed earlier. There are mounting rails and finished upholstery panels secured to this access panel. Since the outer edges of the upholstery panels that cover the aft bulkhead are right up against the upholstered side panels, and are secured top and bottom by parallel aluminum mounting rails, it is difficult to get your finger (or worse, a screwdriver blade) behind the finished panels to bow them enough to remove them. Usually the frustrated technicians do the inevitable and pry a corner out of the aluminum rail with a screwdriver, damaging both the edge of the upholstered trim panel and the extruded mounting rail. To prevent this, install pull-tabs fabricated from the finish material (leather or vinyl) in the vertical center of each trim panel about 6 or 8 inches from each end. Now removal is a snap; just pull the tabs and the panel will bow in the middle and pop out.
Due to the above-mentioned difficulties, it’s common to have torn or bent edges on the interior panels themselves. Bent edges can be straightened with the tapping method described earlier. Tears at the edges, however, cannot be repaired since these panels tuck snugly into the mounting rails, and fit is critical. In that case, a new .020” aluminum panel must be fabricated.
Armrests used in this generation of side panels, although somewhat dated in appearance, are extremely well made and rarely require repair. That being said, the vacuum formed pans that form the pilot and co-pilot armrest recessions were made from that insidious royalite vacuum formed plastic and are always warped. They will need to be heated and re-formed back to their designed shape, and reinforced with aluminum so they won’t re-warp in the future. Did I mention, I hate that plastic stuff?
Once Beech got it right, the bean counters got control of the engineering department and, in the interests of weight and money, the age of plastic interiors was born. I’m referring to the final and current generation of interior side panels, armrests, and headliners. When we do a renovation at our shop, we seem to spend the most time and money repairing and modifying interior components in these newer airplanes. Part of the trouble stems from the use of vacuum formed royalite for the complex-shaped armrests, window frames, spar covers, and other small interior trim components. I plan to go into a complete repair exposé on these parts in a future installment, but for now we’ll stay focused on side panels.
To fabricate the main side panel pieces, Beech used a delicate composite honeycomb material very similar in construction and strength to high quality corrugated cardboard. As if that wasn’t bad enough, the entire left side panel from the firewall to the aft end of the cabin was fabricated as one piece. Guess what happens when the technicians need to get behind that long panel. The inflexible material becomes kinked and torn as people try to work behind the panel without completely removing it. Even if a careful technician decides to do the right thing (removing the window frames and then the entire one-piece side panel), damage often occurs in the effort to get this monstrous piece out of the cabin.
Due to the delicate nature of these composite panels, just removing the old upholstery material (usually one big piece of vinyl or leather) is very difficult. Great caution must be taken not to damage the finished edge of this composite material as you carefully peel the well-glued material off of the panel’s edge. We cut the vinyl or leather about one inch in from the edge around the entire perimeter of the panel. This technique makes it possible to peel the material away from the delicate edge of the panel, rather than peeling it over the edge. This is much faster than the more traditional method of starting to peel the material from the back side first.
Once completely stripped, the repair process begins (very few components escape the need for repair). Damage comes in three forms: tears and cracks, deformed edges, and missing sections. For a quick, strong, versatile, and durable fix, we use cyanide acrylite adhesive and thin 2 oz model makers fiberglass cloth (available from Lone Star Models, 972-218-9663, among other places). The adhesive cures instantly when activated with the spray accelerator. As it cures it gets so hot that it actually sizzles, fusing the entire bonded repair into one strong monolithic fix. We’ve seen evidence of all types of creative repair attempts in the field, ranging from the simple use of tape to extensive efforts with different epoxies, but I think you’ll find the process described here to be a very good solution.
For the repair of a tear or crack, place the panel in question on a flat surface and thoroughly clean the damaged area. Cut a piece of the model makers fiberglass to conform to the shape of the damaged area. Apply the adhesive and spray on the instant curing accelerator. Then flip the panel over and repeat the process on the opposite side and the repair is complete. Be sure to wear rubber gloves and a charcoal mask as this adhesive is very unhealthy stuff.
Crushed and torn edges must first be formed back to their designed shape. Then apply the fiberglass cloth to one side as described above. Trim the thin cloth to the desired shape with scissors. Use a plastic filler powder to fill in voids (ground up acrylic works well), and apply some adhesive. Next apply a second layer of cloth to the opposite side. Trim the edge, do a little surface sanding, and this part of the panel is as good as new.
The last repair challenge is to replace a completely missing section. At Air Mod we have the good fortune of having “donor” panels as a source of repair material to use for grafting on a missing piece. If you don’t have this material available to you, go to the hobby shop and buy balsa wood stock that is the same thickness as the original panel. Cut it to the required shape and overlay both sides of the repair with the model makers cloth and adhesive. The repair will be light, strong, and durable. I know balsa wood burns, but it is used in such a small amount that it will not have an appreciable effect on the over-all combustibility of the interior. This is perfectly within the provisions of the FARs and safe practice.
We’ve made it through side panels. Next month we will get into the less extensive subject of late-style headliners. If you have a 1973 or newer airplane, you are probably familiar with the all too common deformation and gaps, to say nothing of sagging headliners in post-1980 airplanes. Don’t worry, there are some great fixes for these ailments. Until then, fly safe.